

That acrid, burnt sensation at the back of your throat isn't just a nuisance; it's a clear sign that your hardware is failing you. You've likely spent good money on premium e-liquid only for it to taste like scorched cotton because of a spent atomiser. It's frustrating when a simple maintenance task leads to messy leaks or confusing compatibility issues with your specific tank or pod.
We understand that since the 2025 ban on disposable vapes, many UK vapers have transitioned to refillable systems and now face the learning curve of hardware upkeep. Learning how to replace vape coils correctly is the single most important skill for maintaining your kit. It ensures you get the best performance from your device while avoiding the waste of expensive liquid. This professional guide breaks down the process into a simple three-stage method: diagnostic, physical swap, and priming. We will show you how to identify the right coil for your TPD-compliant 2ml tank and how to prepare it for a perfect first puff. By the end of this article, you'll have the confidence to keep your OXVA or other pod kits running at peak efficiency with restored flavour and thicker vapour production.
Key Takeaways
- Identify the tell-tale signs of a failing atomiser to prevent a burnt taste from ruining your favourite e-liquid.
- Distinguish between push-fit and screw-in designs to ensure you select the correct replacement for your specific kit.
- Follow our professional walkthrough on how to replace vape coils to achieve a clean, successful swap every time.
- Master the manual priming method to protect your cotton and guarantee instant flavour and vapour production.
- Resolve common issues like leaking or "no atomiser" errors with our practical maintenance troubleshooting guide.
Recognising the Tell-Tale Signs Your Vape Coil Needs Replacing
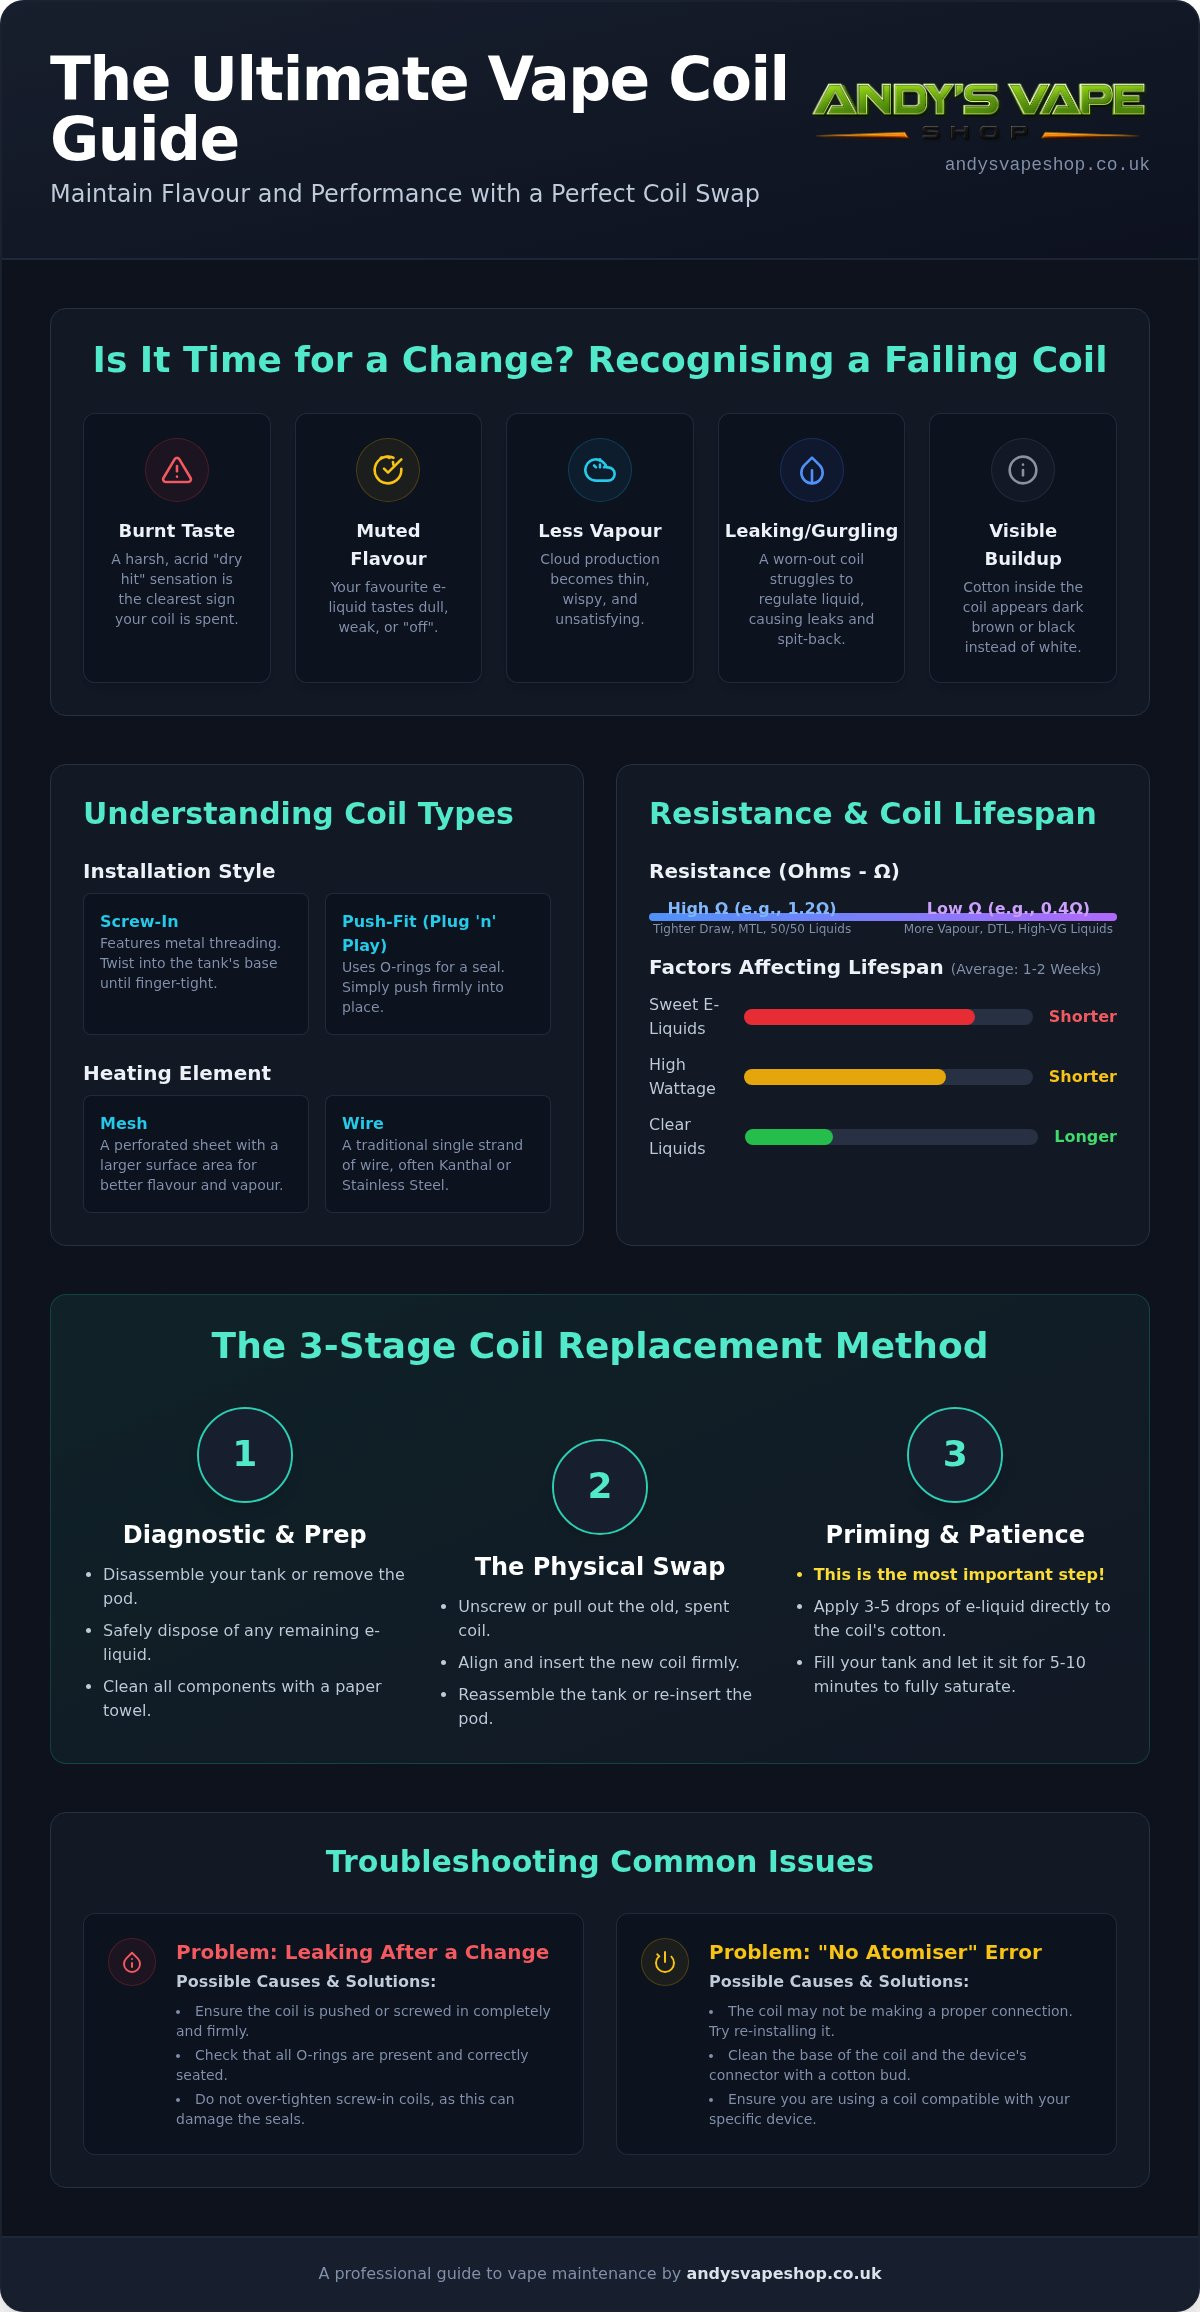
Your vaping experience relies entirely on the condition of your atomiser. When the performance dips, it's usually the coil's way of telling you it's time for a change. Recognising these signals early prevents you from wasting e-liquid and protects your hardware from unnecessary strain. If you've noticed a sharp, acrid sensation that catches in your throat, you've experienced a "dry hit." This happens when the wicking material is no longer saturated, causing the heating element to scorch the dry cotton. It's the most urgent sign that you need to learn how to replace vape coils before taking another puff.
Other symptoms are more gradual but equally frustrating. You might notice:
- Muted flavour: Your favourite e-liquid starts to taste dull or "off," losing the crisp notes it had when the coil was fresh.
- Reduced vapour production: The clouds become thinner and less satisfying, even on a full battery.
- Gurgling and leaking: A worn-out coil often struggles to regulate liquid flow. This leads to flooding in the e-cigarette components, causing spit-back or leaks through the airflow vents.
- Visible buildup: If you peer into the centre of your pod or tank, the cotton should be white. If it looks dark brown or black, it's past its prime.
The Science of Coil Degradation
Coils don't just "break"; they degrade through a process of carbonisation. Many popular e-liquids contain sweeteners like sucralose. These sugars don't always vaporise completely. Instead, they caramelise on the heating element, creating a sticky, black crust. Industry experts call this "coil gunk." This residue acts as a barrier between the heat and your liquid, forcing the device to work harder whilst ruining the taste. Simultaneously, the organic cotton wicking material loses its structural integrity over time, failing to draw liquid to the wire efficiently.
How Long Should a Coil Actually Last?
Lifespan varies significantly based on your habits and hardware choice. High-wattage sub-ohm vaping puts more stress on the wire and cotton than low-power mouth-to-lung kits. If you use heavily sweetened "dessert" flavours, you'll likely need to change your coil more frequently than someone using clear menthol liquids. Knowing how long do oxva coils last can help you plan your maintenance cycles and avoid being caught without a spare. Most vapers find that a single coil lasts between one and two weeks. Buying your replacements in multi-packs is the most cost-effective way to ensure you're always prepared for a fresh swap.
Understanding Different Coil Types and Casing Styles
Before you master the physical steps of how to replace vape coils, you must identify exactly which component your device requires. Since the 2025 disposable ban, the UK market has consolidated around a few specific designs. Most modern hardware uses one of two main styles: replaceable coils that fit into a reusable tank or pod, or integrated pods where the coil is built-in. Integrated pods, common in some beginner kits, require you to discard the entire plastic housing when the flavour drops. However, for most rechargeable kits, you only need to swap the internal atomiser.
- Screw-in coils: These feature metal threading at the base. You must twist them into the chimney of the tank until they are finger-tight.
- Push-fit coils: Also known as "Plug 'n' Play," these rely on rubber O-rings to create a vacuum seal. They are faster to change and less prone to cross-threading.
- Mesh vs Wire: Traditional wire coils use a single strand of Kanthal or Stainless Steel. Mesh coils use a perforated metal sheet, providing a larger surface area for better flavour and longer life.
- Resistance (Ohms): This number determines how much power the coil can handle. A lower number (e.g., 0.4ohm) produces more vapour, whilst a higher number (e.g., 1.2ohm) is better for a tighter, cigarette-like draw.
Choosing the Right Replacement Coil
Always check the laser-etched markings on the side of your current coil casing. These small numbers tell you the resistance and the recommended wattage range. It's vital to match this resistance to your battery's output and your e-liquid's thickness. High-VG liquids work best with low-resistance mesh coils; 50/50 salts require higher resistance. If you're unsure about compatibility, our guide to choosing your perfect vape juice explains how to pair your liquid with your hardware for the best results.
The Rise of Push-Fit Technology
Modern kits have simplified maintenance significantly. The OXVA Xlim series, for example, is a benchmark for ease of use. These devices utilise high-quality O-rings to ensure a leak-proof experience without the faff of traditional threading. This design aligns with UK government regulations on vape products by maintaining a secure, tamper-resistant seal within the 2ml tank limit. If you want to keep your kit running smoothly, you can browse our range of authentic coils to find the exact match for your device.
Step-by-Step Guide: How to Change Your Coil Correctly
Mastering how to replace vape coils is a straightforward process, but it requires a methodical approach to avoid a sticky mess. Before you begin, always have a piece of kitchen roll nearby. E-liquid is notoriously oily; having a clean surface prevents it from staining your furniture or making your device difficult to grip. Ensure your hands are dry to maintain full control over the small, often slippery components of your kit.
Start by detaching the tank or pod from your battery. If you're using a traditional mod, unscrew the 510 connection at the top. For pod systems, simply pull the pod out of its magnetic housing. This is the ideal moment for a quick maintenance check. Use your kitchen roll to wipe the "chimney" and the base of the device. Removing condensation and stray droplets here prevents future gurgling and ensures a strong electrical connection between the coil and the battery pins. A clean device is a reliable device.
Replacing a Coil in a Traditional Vape Tank
Standard tanks usually require you to unscrew the bottom metal plate to access the internal hardware. To avoid wasting your e-liquid, either ensure the tank is completely empty or hold it upside down so the liquid sits against the top cap, away from the chimney opening. Once you've unscrewed the base, remove the spent coil and dispose of it in a bin. Before installing the fresh one, inspect the rubber O-rings on the tank base. If they are pinched or missing, your tank will inevitably leak. Screw the new coil in firmly until it's finger-tight. Avoid over-tightening, as this can damage the delicate threads or make the next swap much harder.
Replacing a Coil in a Modern Pod System
Pod kits have simplified maintenance significantly. Modern hardware, such as the OXVA Xlim series, uses a "pull and push" design that eliminates the faff of threading. Once the pod is removed from the battery, locate the base of the coil. Grip the protruding metal edge and pull it straight out. Slide the new coil into the central slot, ensuring it is perfectly flush with the plastic base of the pod. If there is even a tiny gap, the vacuum seal will break. This is the most common cause of leaking in TPD-compliant 2ml pods. A flush fit guarantees that the O-rings are doing their job, keeping your liquid where it belongs whilst providing a consistent, airy draw every time you vape.
Why Priming Your Coil is the Most Important Step
Priming is the final, non-negotiable step in learning how to replace vape coils. It is the process of pre-saturating the organic cotton wicking material with e-liquid before you ever press the fire button. If you skip this, the heating element will glow red hot against dry cotton, causing an instant burn. This simple act of preparation makes the difference between a coil that lasts two weeks and one that is ruined in two seconds. It is the most common mistake vapers make, yet it is the easiest to avoid.
The most effective technique is the manual drop method. Before you slide the coil into your pod or screw it into your tank, locate the small wicking ports on the metal casing where the white cotton is visible. Apply one or two drops of e-liquid directly to each of these ports. You should also add three drops down the centre chimney, allowing the liquid to soak into the inner layers of the wick. This ensures that the core is damp before the hardware is even installed. It provides a vital safety net for that first puff.
Patience is your best tool here. We recommend the "Wait and See" rule. After filling your 2ml TPD-compliant tank, let the device sit upright for at least five to ten minutes. If you are in a hurry, you can perform a "dry pull." Close the airflow slightly and draw air through the mouthpiece without firing the battery. This creates a vacuum that forces liquid into the cotton fibres, ensuring total saturation throughout the atomiser head.
The Dangers of the "Dry Hit"
A "dry hit" occurs when the coil's heating element reaches temperatures high enough to singe the cotton. Once those fibres are scorched, the burnt taste is permanent. You cannot "wash out" a burnt flavour; the carbonisation of the cotton means the coil is physically damaged and will continue to produce acrid vapour. Priming protects your investment in hardware and prevents you from wasting a full tank of premium e-liquid. It is the only way to guarantee the clean, crisp flavour you expect from your kit.
A Professional Priming Routine
Follow this three-step routine for every new coil to ensure maximum longevity:
- Step 1: Apply 3-5 drops of liquid to the centre and side wicking ports before installation.
- Step 2: Install the coil, fill your tank, and wait 10 minutes to allow the vacuum to settle.
- Step 3: Start your device at a lower wattage than usual. If your coil is rated for 20W, start at 12W and take a few short puffs. Gradually increase the power over the first hour until you reach your preferred level.
If you need to restock your maintenance essentials, you can buy replacement coils in multi-packs to ensure you always have a fresh start ready for your next flavour swap.
Troubleshooting Common Issues After a Coil Change
Even when you have mastered how to replace vape coils, you might encounter minor technical hiccups after a fresh swap. These issues are rarely fatal for your device but can be frustrating if you don't know the quick fixes. Most post-maintenance problems stem from physical connection errors or simple physics rather than faulty hardware. If your mod displays a "No Atomiser" or "Check Atomiser" message, the electrical circuit is broken. Remove the pod or tank and ensure the base of the coil is making clean contact with the battery pins. A quick wipe with kitchen roll to remove stray droplets often solves this instantly.
Persistent leaking is another common complaint that vapers often misdiagnose as a faulty product. Whilst a manufacturing defect is possible, leaking usually occurs because the vacuum seal within the 2ml tank has been compromised. Check that your tank isn't cross-threaded and that all rubber O-rings are seated flat against the metal. If you've just refilled, ensure the fill port bung is pressed firmly into place. Atmospheric pressure changes can also force liquid through the cotton; avoid leaving your kit in a hot car or taking it on a flight without emptying the tank first.
Managing Gurgling and Flooding
If your device makes a bubbling sound or spits hot liquid onto your tongue, the coil is "flooded." This happens when too much e-liquid has entered the centre chimney. You can resolve this using the "flick" technique. Wrap a piece of kitchen roll around the mouthpiece, hold the device firmly, and flick it downwards toward the floor. This uses centrifugal force to eject the excess liquid. Alternatively, you can blow gently into the mouthpiece whilst holding a tissue over the airflow vents to clear the deck. Always ensure your e-liquid thickness matches your coil's resistance. Using thin 50/50 juice in a high-power sub-ohm coil will almost certainly cause flooding.
When to Admit a "Dud" Coil
Manufacturing defects do occur amongst even the best authentic batches. If you have primed correctly, checked your O-rings, and verified your wattage, but still experience a burnt taste or "No Atomiser" error, you may have a "dud." This is why we recommend buying your maintenance essentials from reputable UK retailers. Authentic hardware from brands like OXVA undergoes rigorous quality control. Cheap clones found on some marketplaces often skip these safety checks. If you've exhausted this checklist, it's time to swap in another fresh element from your multi-pack and move on.
Keep Your Kit Performing at Its Best
Mastering the simple process of how to replace vape coils is the most effective way to protect your investment and maintain the quality of your vaping experience. By recognising the early signs of degradation and following a disciplined priming routine, you can eliminate burnt hits and ensure every puff is as crisp as the first. Whether you use a traditional tank or a modern push-fit pod system, regular maintenance is the key to consistent vapour production and hardware longevity.
Always choose genuine hardware to avoid the risks associated with poor-quality clones. We provide expert support for all UK vapers and stock a comprehensive selection of 100% authentic replacement coils to keep your device running smoothly. With fast UK-wide shipping on all maintenance essentials, you will never have to settle for muted flavour or a leaky tank again. Take control of your setup today and experience the difference that a fresh, well-primed coil makes to your daily routine.
Ready to refresh your setup? Browse our full range of replacement vape coils and OXVA kits to find the perfect match for your device. Enjoy the reliable, high-quality performance you deserve with our specialist hardware and expert guidance.
Frequently Asked Questions
How often should I replace my vape coil?
You should typically replace your coil every one to two weeks. This timeframe varies based on how frequently you vape and the power settings you use. High-wattage sub-ohm vaping exhausts the wicking material faster than low-power mouth-to-lung setups. If you notice a drop in vapour production or a slight change in the flavour profile, it is time for a fresh atomiser. Regular swaps ensure your device remains efficient and your e-liquid tastes exactly as intended.
Can I clean and reuse a burnt vape coil?
You cannot successfully clean or reuse a burnt coil. Once the internal organic cotton is scorched, the carbonised fibres are permanently damaged. Rinsing the coil in water or alcohol might remove surface residue, but it won't fix the singed core. You will still experience an acrid, unpleasant taste that ruins your e-liquid. It is always safer and more effective to install a new, authentic replacement from a sealed pack to restore your kit's performance.
Why does my new vape coil taste burnt immediately?
An immediate burnt taste usually happens because the coil wasn't primed correctly before use. If you fire the device whilst the cotton is still dry, the heating element singes the fibres instantly. Always apply a few drops of liquid directly to the wicking ports and wait at least ten minutes after filling your tank. This allows the liquid to saturate the core fully. Starting at a lower wattage also helps the new cotton adjust without scorching.
How do I know which coil is compatible with my vape kit?
Compatibility is determined by the specific brand and model of your tank or pod. Most manufacturers laser-etch the resistance and recommended wattage onto the metal casing of the coil itself. You should also check the original packaging or the user manual for your kit. If you're using an OXVA Xlim, for example, you must use Xlim-specific pods or coils. Using the wrong part can lead to leaking or the device refusing to fire entirely.
What happens if I don’t change my vape coil?
Neglecting your hardware leads to a significant decline in your vaping experience. Over time, "coil gunk" builds up on the heating element, which reduces flavour and vapour production. Eventually, the wicking material fails to hold liquid, causing persistent leaking through the airflow vents. In extreme cases, the internal wire may snap or become so clogged that the device displays a "No Atomiser" error. Changing the element regularly prevents these messy and frustrating technical failures.
Why is my vape leaking after I changed the coil?
Leaking after a swap is usually caused by an improper seal or a displaced O-ring. When learning how to replace vape coils, ensure the new part is perfectly flush with the base of the pod or firmly screwed into the tank. If the coil is slightly tilted, the vacuum seal is broken, allowing liquid to escape. Check that you haven't cross-threaded the base and that the rubber seals are intact and free from grit or hair.
Does the type of e-liquid affect how often I need to change the coil?
The ingredients in your e-liquid play a massive role in coil longevity. Liquids with high sugar or sweetener content caramelise quickly, creating a thick residue that clogs the heating element. Similarly, thicker high-VG liquids are harder for small MTL coils to wick, which can lead to dry hits. If you prefer sweet, dessert-style flavours, expect to change your coil more frequently than someone using clear menthol or simple fruit liquids with fewer additives.
Can I change my coil whilst there is still liquid in the tank?
You can change the coil with liquid in the tank, provided you hold the device upside down. Ensure the e-liquid is sitting against the top cap so it doesn't pour out of the chimney when you remove the base. For pod systems, this is even easier as the liquid usually stays contained within the plastic housing if held at the correct angle. However, if your 2ml tank is completely full, it's often cleaner to wait until the level is lower.